favourite-est.
So baby can come any time after today – I finished the cardigan I was working on that I was determined to finish prior to baby’s arrival! I know life/pregnancy doesn’t work that way but hey … I’m ready whenever baby’s ready :) I’m 39 weeks today actually.
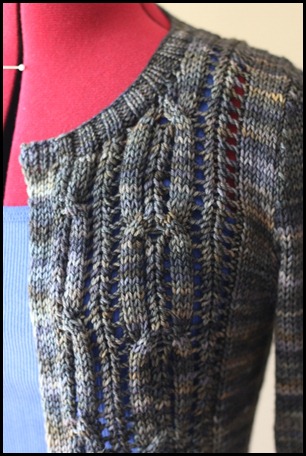
I just want to gush gush gush about this cardigan. I absolutely love it. It is my favourite-est knit EVER. Remember how I was feeling a bit mojo-less and wanting something inspiring to work on? I decided in a moment of weakness to go down to my LYS on Friday and see if there was something that would inspire me. I’ve wanted to make Acer since … Amy published the pattern, probably. I finished the last seam last night and let it dry overnight (thank goodness for warm summer weather!). My one-week cardigan!
Pattern: Acer Cardigan by Amy Christoffers
Yarn: Malabrigo Arroyo in colourway 054 Escorias
Needles: 4.5mm for body & sleeves, 3.5mm for collar and seamed button bands
The Arroyo is closer to a sport weight than a DK. The recommended needle size is 3.5-4mm but I swatched in 4.5mm, got gauge and liked the slightly loose fabric the swatch produced. I was a little nervous about how the lace and cables would look in the finished sweater but they turned out beautifully.
The slightly more open lace leaves the cardigan feeling light and airy, not heavy and very pleasing to wear.
I tried a new technique that I now wish I had tried sooner. The seamed button band from Norah Gaughan is a great addition to this. I think it finishes the cardigan in a slightly cleaner way – and certainly looks very professional. And I love that you can’t see the buttonholes! Especially since I have no intention of ever buttoning this up :)
The ‘formula’ I used for the button band was simple:
For the RIGHT front band, on 3.5mm needles (I used DPNs since there were so few stitches), I cast on 8 stitches.
Row 1 (WS): P2, (K1, P1) 3 times
Row 2 (RS): Sl1 Purlwise, work across in pattern as stitches appear.
Continue until desired length.
For the LEFT front band (buttonholes), repeat above cast on.
Row 1 (WS): Sl1 Purlwise, K1, P1, K1, P1, K1, P2
Row 2 (RS): Work across as stitches appear.
I wanted between 9-11 buttons. I placed the 1st on row 5 as follows:
Buttonhole Row (RS): K2, P1, SSK, YO, K1, P1, K1
When you reach the YO on the WS as you work back, just knit into it as you would if there wasn’t a buttonhole there as this keeps the 1×1 rib pattern going and disguises the buttonhole perfectly. Any questions, please don’t hesitate to ask!
The only thing I will say about the sewn-on button bands is that they are a little finicky when you get to the top – you want the top edges to match up perfectly to create a beautiful edge and this took some re-knitting, ripping and re-seaming. Completely worthwhile though.
The buttons were from my stash and look perfect with this yarn. They are just cheap Countess Basic 99cent buttons :)
I hope that what you’re working on is going well & that you are loving the finished project too! I’d love to hear about it :)


Amazing Rachel! 39 wks pregnant and learning a new technique AND finishing a gorgeous cardigan in one week? Congrats! Take care and try to rest while waiting for your baby…
Thank you Monica! I've been diligent about lots of rest – its so important :)
That looks awesome! I'm knitting Acer for my Ravellenics project, so I'm glad you liked the pattern!
Beautiful Acer. It's been in my queue for a long time and now after seeing yours I'm excited about it all over again.